The Unexpected AI Stack: C# + .NET (Part 3)
Summary
- The application makes several key architectural decisions to make it easier for agents to work with and iterate like using OpenAPI (stable, easy for agents to understand and work with, contract-based) with minimal customization.
- This is wired using standard .NET tooling and Kubb.dev on the frontend to generate the TypeScript API clients
- Using the Copilot SDK allows us to build a powerful agentic application with minimal code (just a few lines of setup). Using .NET’s built in
System.Threading.Channelsallows the application to queue inputs and stream outputs to the frontend — fully typed end-to-end. - To build the skill for CSharpRepl, use your coding agent and “teach” it how to use it correctly rather than re-discovering this each time. YMMV based on your model, your harness, and the complexity of your application DI setup so it is better to use this approach than to provide a canned example.
- Part 1 will introduce two under-the-radar components of the .NET stack that make it surprisingly amenable to building software with agents: Aspire and
CSharpRepl. - Part 2 will dive into a hands-on implementation from the ground up to scaffold an open-source template for teams to build on top of.
- Part 3 (you are here) will implement the next layer of the application including a simple streaming interface to the Copilot SDK agent.
- Part 4 will extend the application with Testcontainers to demonstrate how to simplify test execution for agents with stateless containers as well as add telemetry for runtime visibility.
The full repo: https://github.com/zeeq-ai/zeeq-tmpl
What we’re building
This exercise will build a simple chat application connected to an instance of a Copilot agent via the Copilot SDK.
The Copilot SDK is a good choice for building agentic applications because:
- The SDK supports multiple language bindings including TypeScript, Python, Go, C#, Rust, and Java
- The harness is model agnostic and allows using different models for different tasks and BYOK or use the GitHub Copilot subscription (we’ll be using BYOK for this exercise)
- The SDK is well documented and comes with advanced features for working with and navigating source code.
For the front-end, we’ll build a chat interface using a Vite + Nuxt UI web app using a streaming API. We’ll use Kubb.dev for client generation from OpenAPI specs.
Wiring OpenAPI
Before continuing on and letting the agents loose, we still have a bit of scaffolding to do (this can be moved into a skill, but the purpose of this exercise is to understand the underlying wiring before building a skill template).
Update the .csproj to produce the OpenAPI schema
We’ll need to add a package to the src/server/server.csproj to emit the OpenAPI spec:
cd src/server
dotnet add package Microsoft.Extensions.ApiDescription.Server
A few tweaks are also needed to the .csproj
<Project Sdk="Microsoft.NET.Sdk.Web">
  <PropertyGroup>
    <TargetFramework>net10.0</TargetFramework>
    <Nullable>enable</Nullable>
    <ImplicitUsings>enable</ImplicitUsings>
    <RootNamespace>Zeeq.Tmpl</RootNamespace>
    <UserSecretsId>db43be79-6f94-4d75-9ee0-45d496cfae4d</UserSecretsId>
    <!-- 👇 OpenAPI config -->
    <OpenApiDocumentsDirectory>..\app\src\api</OpenApiDocumentsDirectory>
    <OpenApiGenerateDocumentsOptions>--file-name zeeq-tmpl-api</OpenApiGenerateDocumentsOptions>
  </PropertyGroup>
  <!-- 👇 Don't generate in the Release build (should already be present) -->
  <PropertyGroup Condition="'$(Configuration)' == 'Release'">
    <!-- Suppress OpenAPI document generation in Release; the target checks this property -->
    <OpenApiGenerateDocuments>false</OpenApiGenerateDocuments>
  </PropertyGroup>
  <ItemGroup>
    <PackageReference Include="Microsoft.AspNetCore.OpenApi" Version="10.0.11" />
    <!-- 👇 Added via the `dotnet add package ...` -->
    <PackageReference Include="Microsoft.Extensions.ApiDescription.Server" Version="10.0.11">
      <IncludeAssets>runtime; build; native; contentfiles; analyzers; buildtransitive</IncludeAssets>
      <PrivateAssets>all</PrivateAssets>
    </PackageReference>
    <PackageReference Include="Scrutor" Version="7.0.0" />
  </ItemGroup>
</Project>
Now running dotnet build src/server will produce the OpenAPI schema in src/app/src/api/zeeq-tmpl-api.json.
Wire up Kubb.dev to generate the API client from the schema
Kubb is a TypeScript code generator that uses a plugin architecture to produce client bindings, fakes, validators, and more using the OpenAPI schema.
We’ll use this to generate the API client for the frontend.
cd src/app

# Note: this is using 5.0.0-beta.103
pnpm add -D kubb @kubb/plugin-ts @kubb/plugin-fetch
Now to configure it:
// src/app/kubb.config.ts
import { defineConfig } from "kubb";
import { pluginTs } from "@kubb/plugin-ts";
import { pluginFetch } from "@kubb/plugin-fetch";

export default defineConfig({
  input: "./src/api/zeeq-tmpl-api.json",
  output: {
    path: "./src/api/generated",
    clean: true,
  },
  plugins: [
    pluginTs({
      output: {
        path: "./types",
        mode: "directory"
      },
      enum: {
        type: "asConst"
      },
      optionalType: "questionTokenAndUndefined",
    }),
    pluginFetch({
      baseURL: "http://localhost:5138", // 👈 From the launch profile for the backend
      output: {
        path: "./clients",
        mode: "directory",
      },
    }),
  ],
});
The package.json will need two scripts:
// src/app/package.json
{
  "scripts": {
    "generate": "kubb generate",
    "generate:watch": "kubb generate --watch"
  }
}
Now if we run:
# Manually generate to smoke test the wiring
cd src/app
pnpm generate
This will produce an updated API client in src/app/src/api/generated (recommend adding to your .gitignore).
Automating with Aspire
To automate this generation when the schema updates on build, add another resource to Aspire that watches the OpenAPI schema file and runs the Kubb generation command.
// host/AppHost.cs
var kubb = builder
    .AddExecutable(
        name: "kubb-generate-watch",
        command: "pnpm",
        workingDirectory: "../src/app",
        args: ["generate:watch"]
    )
    .WaitFor(frontend); // 👈 Wait for this because it installs dependencies
Here, we wait for the frontend resource because that will execute the pnpm install command to ensure we have the dependencies.
Aspire makes it easy and straightforward to wire up the supporting components of the stack.
Scaffold the application flow
The application will flow like this:
- The browser application initiates a connection to a streaming API endpoint to read responses from the agent
- When the user sends a prompt from the browser, it goes into a web API endpoint and then into a
System.Threading.Channels.Channelthat queues the prompt for the agent; the user can keep sending prompts and they will be queued in the channel - The agent is an instance of the Copilot harness that is running in a background service connect to the inbound channel to receive the prompt and an outbound channel to stream the responses
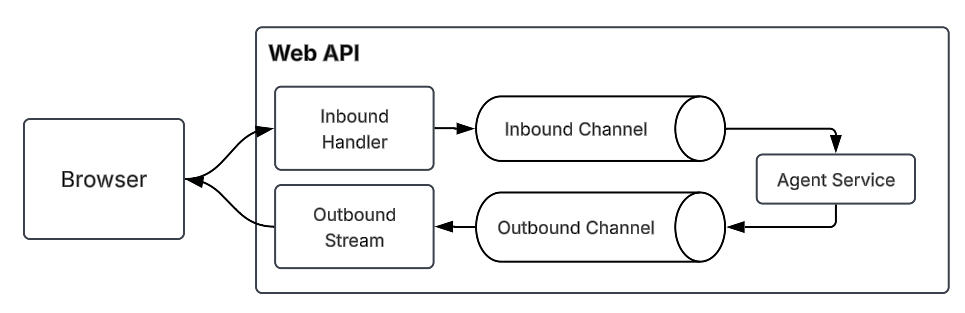 The browser application will call into an API endpoint and then consume the response off a stream.
First, let’s add the .NET SDK for GitHub Copilot:
cd src/server
dotnet add package GitHub.Copilot.SDK
This SDK will allow our backend to operate an instance of the Copilot harness and directly work with any codebase!
With only a few lines of code, we’re going to build the foundations of an agentic application.
(As an alternative, you can also use the Agent Framework AgentHarness if you need more control)
Add AgentServiceWorker to run the agent in the background
The AgentServiceWorker is a background service that will run the agent and handle requests from the API.
The service initializes the Copilot SDK client and session, and then listens for incoming messages on a channel. When a message is received, it sends the message to the agent and writes the response to an outbound channel.
// src/server/AgentServiceWorker.cs
using System.Threading.Channels;
using GitHub.Copilot;
using Microsoft.Extensions.Options;

namespace Zeeq.Tmpl;

public class AgentServiceWorker(
    IOptions<AppSettings> options,
    [FromKeyedServices("inbound")] Channel<string> inboundChannel,
    [FromKeyedServices("outbound")] Channel<string> outboundChannel
) : BackgroundService
{
    // 👇 Change this to some directory on your local disk
    private const string WorkingDirectory = "/Users/cchen/code/zeeq/zeeq-app";
    private CopilotClient? _client;
    private CopilotSession? _session;

    /// <summary>
    /// 1️⃣  Set up the Copilot client and session with BYOK
    /// </summary>
    public override async Task StartAsync(CancellationToken cancellationToken)
    {
        // See: https://github.com/github/copilot-sdk/blob/main/docs/auth/byok.md
        // See: https://github.com/github/awesome-copilot/blob/main/cookbook/copilot-sdk/dotnet/recipe/managing-local-files.cs
        _client = new(new() { WorkingDirectory = WorkingDirectory });
        // 👇 It's easy to create a session with different models and different capabilities
        _session = await _client.CreateSessionAsync(
            new()
            {
                Model = "gpt-5.6-luna",
                OnPermissionRequest = PermissionHandler.ApproveAll,
                Provider = new()
                {
                    Type = "azure",
                    // 👇 This is an Azure OpenAI endpoint; use your own
                    BaseUrl = "https://zeeq-open-ai.openai.azure.com",
                    WireApi = "responses",
                    // 👇 Key set in previous step via `dotnet user-secrets set...` (or hardcode here)
                    ApiKey = options.Value.LlmApiKey,
                },
            },
            cancellationToken
        );

        await base.StartAsync(cancellationToken);
    }

    /// <summary>
    /// 2️⃣  Start the loop that pulls the incoming prompts off of the channel and executes
    /// </summary>
    protected override async Task ExecuteAsync(CancellationToken stoppingToken)
    {
        if (_session is null)
        {
            throw new InvalidOperationException("Copilot session is not initialized.");
        }

        if (_client is null)
        {
            throw new InvalidOperationException("Copilot client is not initialized.");
        }

        // Start the streaming output that writes to the outbound channel
        _session.On<SessionEvent>(evt =>
        {
            if (evt is AssistantMessageEvent messageEvent)
            {
                // 👇 Streams messages out to the SSE endpoint via the channel
                outboundChannel.Writer.TryWrite(messageEvent.Data.Content);
            }
        });

        // Start the message loop here
        while (await inboundChannel.Reader.WaitToReadAsync(stoppingToken))
        {
            while (inboundChannel.Reader.TryRead(out var message))
            {
                // 👇 Reads messages from the inbound channel and forwards to the agent
                await _session.SendAsync(message, cancellationToken: stoppingToken);
            }
        }
    }

    /// <summary>
    /// 3️⃣  Clean up resources when the service is requested to stop.
    /// </summary>
    public override async Task StopAsync(CancellationToken cancellationToken)
    {
        if (_client is not null)
        {
            await _client.DisposeAsync();
        }

        if (_session is not null)
        {
            await _session.DisposeAsync();
        }

        await base.StopAsync(cancellationToken);
    }
}
We’re intentionally keeping it simple here, but keep in mind that this is the full SDK for the GitHub Copilot harness so you can really go wild and build some interesting agentic applications on top of this.
The Copilot SDK supports multiple programming languages (TypeScript/Node, Go, Rust, Java, C#) so it is a solid platform to build agentic applications on top of. It is also likely to have good longevity and stability since it is the same harness that powers GitHub Copilot.
See more docs here:
Microsoft Agent Framework Agent Harness is a lower-level primitive that may be more suitable for some applications, but requires a bit more work to wire up (exercise left to the reader).
Wire it via DI with channels
In Program.cs, we can wire up the channels and the AgentServiceWorker:
// src/server/Program.cs
// Add the channels; keyed for inbound and outbound.
builder
    .Services.AddKeyedSingleton(
        "inbound",
        (sp, key) => Channel.CreateUnbounded<string>()
    )
    .AddKeyedSingleton(
        "outbound",
        (sp, key) => Channel.CreateUnbounded<string>()
    )
    .AddHostedService<AgentServiceWorker>();
This is a single-user, local app so using a singleton for the channels makes sense. In a multi-user, stateless, multi-server application, the design would have to be more nuanced and back the endpoints with an actual messaging layer.
While we’re here, let’s also add the CORS configuration since our frontend and backend are on different ports:
// src/server/Program.cs BEFORE the app has been built
builder.Services.AddCors(options =>
    options.AddDefaultPolicy(policy =>
        policy
            .AllowAnyOrigin()
            .AllowAnyHeader()
            .AllowAnyMethod()
        )
);

// src/server/Program.cs AFTER the app has been built
app.UseCors();
Expose via API endpoints
Now we need to wire both the inbound and outbound API endpoints:
// src/server/Endpoints/Agent.cs
using System.Net.ServerSentEvents;
using System.Runtime.CompilerServices;
using System.Threading.Channels;

namespace Zeeq.Tmpl;

// Inbound endpoint mapping...
public class AgentEndpoint : IEndpoint
{
    public void MapEndpoints(IEndpointRouteBuilder endpoints)
    {
        endpoints.MapPost(
            "/send-prompt",
            (AgentHandler handler, string prompt) => handler.Handle(prompt)
        );
    }
}

// ... and the handler
public class AgentHandler(
    [FromKeyedServices("inbound")] Channel<string> inboundChannel
) : IEndpointHandler
{
    public bool Handle(string prompt) => inboundChannel.Writer.TryWrite(prompt);
}

// Outbound endpoint mapping...
public class AgentResponseEndpoint : IEndpoint
{
    public void MapEndpoints(IEndpointRouteBuilder endpoints)
    {
        endpoints.MapGet(
            "/read-response",
            async (AgentResponseHandler handler, CancellationToken cancellation) =>
                TypedResults.ServerSentEvents(handler.HandleAsync(cancellation))
                // 👆 The response type is SSE; this translates at the OpenAPI spec!
        );
    }
}

// ...and the streaming handler
public class AgentResponseHandler(
    [FromKeyedServices("outbound")] Channel<string> outboundChannel
) : IEndpointHandler
{
    // 👇 Note the typed `SseItem<T>`; in C# 15, this is even nicer with unions
    public async IAsyncEnumerable<SseItem<string>> HandleAsync(
        [EnumeratorCancellation] CancellationToken cancellation
    )
    {
        while (await outboundChannel.Reader.WaitToReadAsync(cancellation))
        {
            while (outboundChannel.Reader.TryRead(out var response))
            {
                yield return new SseItem<string>(response);
            }
        }
    }
}
Here, you might wonder why the separation of the HTTP endpoint from the handler since the code is quite simple.
This is an intentional pattern because the handler is injected into the DI container. This means that the application can attach authentication and input validation (including deserialization) at the app endpoint, but the agent can use CSharpRepl to directly manipulate the handler without going through the HTTP layer.
Note how nicely everything is typed. When the client is generated via Kubb, the type information flows through to the frontend as well.
In the upcoming C# 15 release, this story gets even better with union types which map cleanly at the boundary and translate directly into TypeScript union types.
Building a simple frontend
The frontend in its current state is cloned from the Nuxt UI template.
Some adjustments are needed to build a simple chat interface to the agent.
Add packages for Markdown and code rendering
We’ll need two packages to help with the display of Markdown and code snippets
cd src/app
pnpm add @comark/vue shiki
A small update to the vite.config.ts is needed to add the @comark/vue plugin:
// src/app/vite.config.ts
export default defineConfig({
  plugins: [
    vueRouter({
      dts: 'src/route-map.d.ts'
    }),
    vue(),
    ui({
      prose: true, // 👈 Need to add this (see the Nuxt UI docs)
      ui: {
        colors: {
          primary: 'green',
          neutral: 'zinc'
        }
      }
    })
  ]
})
You can learn more about Nuxt UI Markdown rendering and typography in the docs.
Implement the chat agent composable
Building the backend produces an updated OpenAPI schema which the Kubb watcher should pick up and create new stubs.
We can use these stubs in a Vue composable to implement the interface to the backend API.
import { ref } from 'vue'
// 👇 Import the API clients from the Kubb generated output
import { postSendPrompt } from '../api/generated/clients/postSendPrompt'
import { getReadResponse } from '../api/generated/clients/getReadResponse'

export type ChatStatus = 'ready' | 'submitted' | 'streaming' | 'error'

export interface ChatTextPart {
  type: 'text'
  id: string
  text: string
}

export interface ChatMessage {
  id: string
  role: 'user' | 'assistant'
  parts: ChatTextPart[]
}

/** No explicit end-of-turn signal comes from the server, so a response is
 * considered finished once no new chunk has arrived for this long. */
const READY_DELAY_MS = 800

export function useAgentChat() {
  const messages = ref<ChatMessage[]>([])
  const status = ref<ChatStatus>('ready')

  let readyTimeout: ReturnType<typeof setTimeout> | undefined
  let assistantMessage: ChatMessage | undefined
  let responseStreamStarted = false

  function scheduleReady() {
    clearTimeout(readyTimeout)
    readyTimeout = setTimeout(() => {
      status.value = 'ready'
      assistantMessage = undefined
    }, READY_DELAY_MS)
  }

  async function consumeResponseStream() {
    const { stream } = await getReadResponse()

    for await (const event of stream) {
      const chunk = typeof event.data === 'string' ? event.data : ''
      if (!chunk) continue

      if (!assistantMessage) {
        assistantMessage = {
          id: crypto.randomUUID(),
          role: 'assistant',
          parts: [{ type: 'text', id: crypto.randomUUID(), text: '' }],
        }
        messages.value.push(assistantMessage)
      }

      assistantMessage.parts[0].text += chunk
      status.value = 'streaming'
      scheduleReady()
    }
  }

  async function sendPrompt(prompt: string) {
    const trimmed = prompt.trim()
    if (!trimmed || status.value === 'submitted' || status.value === 'streaming') return

    messages.value.push({
      id: crypto.randomUUID(),
      role: 'user',
      parts: [{ type: 'text', id: crypto.randomUUID(), text: trimmed }],
    })

    status.value = 'submitted'
    assistantMessage = undefined

    if (!responseStreamStarted) {
      responseStreamStarted = true
      consumeResponseStream().catch(() => {
        status.value = 'error'
      })
    }

    try {
      await postSendPrompt({ query: { prompt: trimmed } })
    } catch {
      status.value = 'error'
    }
  }

  return { messages, status, sendPrompt }
}
Use the composable in the UI
And now we update the UI to implement a simple chat interface once again using Nuxt UI components:
<template>
  <div class="flex h-full justify-center p-4">
    <UCard
      class="flex h-full w-full max-w-md flex-col"
      :ui="{ body: 'flex-1 min-h-0 overflow-y-auto', footer: 'shrink-0' }"
    >
      <UChatMessages
        :messages="messages"
        :status="status"
      >
        <template #content="{ message }">
          <template
            v-for="part in message.parts"
            :key="part.id"
          >
            <Markdown
              v-if="part.type === 'text'"
              :value="part.text"
              :plugins="[shiki()]"
              :streaming="message.role === 'assistant' && status === 'streaming'"
              unwrap
            />
          </template>
        </template>
      </UChatMessages>

      <template #footer>
        <UChatPrompt
          v-model="input"
          :status="status"
          @submit="onSubmit"
        >
          <UChatPromptSubmit :status="status" />
        </UChatPrompt>
      </template>
    </UCard>
  </div>
</template>

<script setup lang="ts">
import { ref } from 'vue'
import { Markdown } from '@comark/vue'
import shiki from '@comark/vue/plugins/shiki'
import { useAgentChat } from '../composables/useAgentChat'

const input = ref('')
const { messages, status, sendPrompt } = useAgentChat()

function onSubmit() {
  const prompt = input.value
  input.value = ''
  sendPrompt(prompt)
}
</script>
Here, we can see Nuxt UI paying huge dividends by providing not only a very rich, comprehensive set of components, but also agent-friendly docs to build rapidly.
Nuxt UI includes a nice set of components for this, out of the box:
With plenty more to build a fully-featured agent interface.
Adding a skill for CSharpRepl
Agents can figure out CSharpRepl by themselves since the CLI itself has good instructions, but it will help A LOT if we provide the agents examples of how to work with CSharpRepl. We can effectively capture the key scenarios that the agents need to know about by walking the agent through how we want it to use the CSharpRepl CLI.
Rather than provide the finished skill, I’ll share the prompts that you can use to get the agent to build the skill.
Create the skill directory and placeholder file
Different harnesses will acquire local skills in different ways (for now) so we will need to do some basic scaffolding of the skill for different harnesses.
# Add the .agents directory which most harnesses will use
mkdir .agents
mkdir .agents/skills
mkdir .agents/skills/csharprepl
touch .agents/skills/csharprepl/SKILL.md

# Add the .claude directory and symlink the skills
mkdir .claude
cd .claude
ln -s ../.agents/skills skills

# Codex should already be present; symlink the skills
cd .codex
ln -s ../.agents/skills skills
This should cover all mainstream harnesses.
Prompt the agent to write the key instructions for the skill
We’ll use the agent to build the skill directly by having the agent run the CLI.
Your results may vary by harness, model, and your prompts so here’s my guide to help the agent discover and build the key elements of the skill.
(Note: best to paste each prompt one-by-one to see the agent iterate on building the skill)
<!-- Prime the agent so it knows what we're doing -->
We're working on writing a skill in .agents/skills/csharprepl/SKILL.md for the CSharpRepl CLI.
CSharpRepl is a REPL that allows agents to execute C# code in a running .NET application.
Our goal is to keep this skill short, terse, to the point with key examples broken down into sections.
Each section should have one code block that demonstrates the different commands relevant to that section.
Use comments above the command in the fenced code block to explain the command and use case.
Keep writing dense and terse; to the point and instructional with notes for key operational details.
We'll do this iteratively and refactor this document as we learn.
Start by running `csharprepl connect -h` to learn the commands.
Write a quick introductory section and then a table of the key basic commands.
When done, I'll prompt the next experiment

<!-- Now let's ask it to get an instance of the health service and replace it -->
Read: https://fuqua.io/blog/2026/06/injecting-a-csharp-repl-into-a-running-net-process/
Read: https://github.com/waf/CSharpRepl/wiki/Connecting-to-a-Running-Process
Acquire an instance of the `HealthHandler` and use `#replace` to replace it with a different implementation.
<example>
printf '%s\n' \
  '#replace Zeeq.Tmpl.HealthHandler.Handle with (instance) => "Healthy (replaced!)"' \
  'var health = Get<Zeeq.Tmpl.HealthHandler>(); var msg = health.Handle(); msg' \
  | NO_COLOR=1 csharprepl connect 92260 --streamPipedInput
<example>
Use `aspire logs` to see the output and verify that the replace worked.
Document your findings and how to use #replace in the skill file.
When done, I'll prompt the next experiment

<!-- Now let's ask it to get an instance of the health service and wrap it -->
Read: https://fuqua.io/blog/2026/06/injecting-a-csharp-repl-into-a-running-net-process/
Read: https://github.com/waf/CSharpRepl/wiki/Connecting-to-a-Running-Process
Acquire an instance of the `HealthHandler` and use `#wrap` to wrap it with a console log.
Use `aspire logs` to see the output and verify that the wrap worked.
Document your findings and how to use #wrap in the skill file.
When done, I'll prompt the next experiment

<!-- We also want to prompt it to learn how to use .csx files for more complex ops-->
Now do both exercises again using `--eval-file` and write a `.csx` file to perform the same action.
Update and document any findings necessary in the file
When done, I'll prompt the next experiment

<!-- Tighten up the notes to make it more dense -->
Write notes more dense
Compact but no loss of clarity
Keep key details only
Terse notes and comments

<!-- Experiment with the `-u` flag to make code more terse-->
Test -u --using <namespace> and document
This makes scripts more terse (no namespace inline)
Update and document any findings necessary in the file
By providing the agent reference docs and a few examples with clear instructions for discovery, the agent is able to self-materialize the skill with the key information we need it to have.
Closing thoughts
At this point, we have a solid foundation for building an agentic application on top of Aspire using .NET, C#, the Copilot SDK, and a Vue + Nuxt UI frontend.
This set of exercises moves very intentionally so human operators can have a clear view of what’s happening in the code and we’ve made very specific design decisions on how to wire up our endpoints to make it more friendly for agents to work with.
The setup is now built for coding agents to work with the codebase and iterate on the application itself.
In the final part of this series, we’ll add a planning surface that is designed to interact with agents as you write a specification. This allows the agents to work iteratively as you build your plan.
We’ll still move with purpose so that each technical decision is clear and explained in the context of building an agentic foundation for an application.
If you are curious to see a real-world setup, check out the Zeeq.ai repo: https://github.com/zeeq-ai/zeeq-app
Still human written (mistakes and all!); see the file history in the repo.