The Unexpected AI Stack: C# + .NET (Part 2)
Summary
- This exercise will set up the foundational scaffolding for a typical Vite frontend app connected to a standalone backend via OpenAPI. The objective is to focus on the DX and getting key pieces in place so that agents a team can operate on top of this codebase and iterate rapidly with agents.
- Mise is used to simplify the installation of required tooling and the runtime environment for development
- Aspire is used to orchestrate the runtime components of the application
- We’ll also wire up CSharpRepl and give it a test run, but there’s not much for it to do yet!
- Part 1 will introduce two under-the-radar components of the .NET stack that make it surprisingly amenable to building software with agents: Aspire and
CSharpRepl. - Part 2 (you are here) will dive into a hands-on implementation from the ground up to scaffold an open-source template for teams to build on top of.
- Part 3 will implement the next layer of the application including a simple streaming interface to the Copilot SDK agent.
- Part 4 will extend the application with Testcontainers to demonstrate how to simplify test execution for agents with stateless containers as well as telemetry for runtime visibility.
The full repo: https://github.com/zeeq-ai/zeeq-tmpl
What we’re building
This exercise will build a chat frontend application connected to an instance of a Copilot agent via the Copilot SDK.
The Copilot SDK is a solid choice for building agentic applications because:
- The SDK supports multiple language bindings including TypeScript, Python, Go, C#, Rust, and Java
- The harness is model agnostic and allows using different models for different tasks and BYOK or use the GitHub Copilot subscription (we’ll be using BYOK for this exercise)
- The SDK is well documented and comes with advanced features for working with and navigating source code.
For the front-end, we’ll build a chat interface using a Vite + Nuxt UI web app using a streaming API. We’ll use Kubb.dev for client generation from OpenAPI specs.
Part 3 will focus more on the build out; here, we’re setting up the foundation first.
Scaffolding the runtime configuration
The runtime will require configuring Mise to install the tooling that we’ll need. This makes it easier for teams to onboard new developers by simplifying the installation process and ensuring developers have the right versions of tools installed with minimal friction.
Configuring Mise
Install Mise for your platform following the instructions
# Create the config directory and place the mise.toml file there
mkdir .config
cd .config
touch mise.toml
The config file needs to specify our dependencies. The easiest way to do this from the command line is to type mise use which has auto-complete for popular packages:
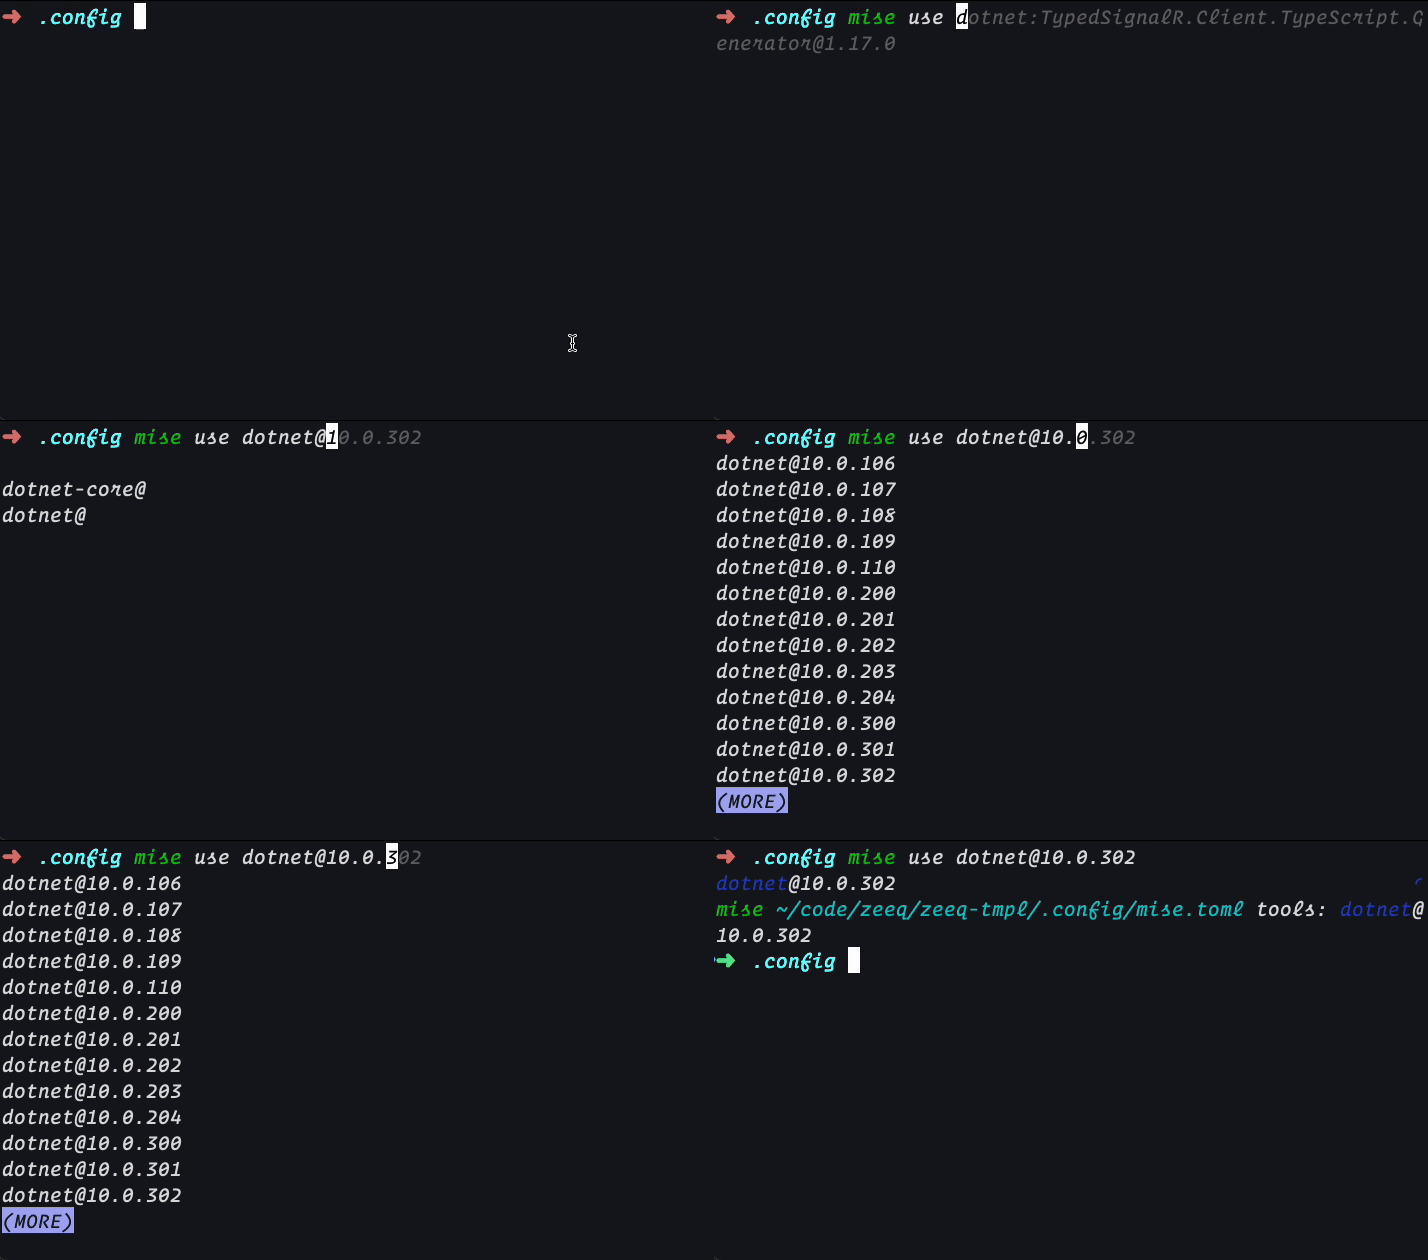
This will add entries into the mise.toml file like this:
[tools]
dotnet = "10.0.302"
Here’s the full file of the tools we’ll need:
[tools]
dotnet = "10.0.302"
"dotnet:Aspire.Cli" = "13.4.6"
"dotnet:CsharpRepl" = "0.9.2"
"dotnet:Csharpier" = "1.3.0"
node = "26"
pnpm = "11.18.0"
(Update the versions as necessary)
When pulling the stack, run mise install to configure a local environment with the correct versions of the specified tools.
Wire up AGENTS.md and CLAUDE.md as a symlink
# At the root, create the AGENTS.md file and symlink it to CLAUDE.md
touch AGENTS.md
ln -s AGENTS.md CLAUDE.md
Here’s the simple AGENTS.md we’ll use to describe how the agent should work in this repo:
# .NET 10, C# 14 Web API with Nuxt UI and Vite Frontend

- `src/server`: .NET 10, C# 14; use modern language features (primary constructors, deconstruction, pattern matching, switch expressions, named tuple types, etc.)
- `src/app`: Vue 3, Nuxt UI, Vite, TypeScript, Tailwind CSS

## Tooling

### Nuxt UI Rules

- Prefer Nuxt UI components first before writing new components
- Use Nuxt UI **component slots** first when suitable
- Use Nuxt UI **component props** before writing custom layout or style
- <https://ui.nuxt.com/llms.txt> has dense listing of components available to check
- <https://ui.nuxt.com/llms-full.txt> (download and search)

### Icons, Text, Tailwind

- Use `lucide` for Nuxt UI (`i-lucide-*`)

### Aspire CLI

```shell
aspire -h

# Get resources if needed; but usually just use the rebuild command below
aspire ps

# Avoid restarting the full stack; just rebuild the server
aspire resource app-backend rebuild
```

### Playwright MCP

Use the Playwright MCP to run the app in a browser and test the UI.

For UI work, get access first thing **before** you start!
Set up the Nuxt UI and Playwright MCP
The Playwright MCP will give the agent access to operate on the UI to perform UI layer E2E testing.
# Nuxt UI
claude mcp add --scope project --transport http nuxt-ui-remote https://ui.nuxt.com/mcp

# Playwright
claude mcp add --scope project playwright -- npx -y @playwright/mcp@latest --extension
This creates the following .mcp.json
{
  "mcpServers": {
    "playwright": {
      "type": "stdio",
      "command": "npx",
      "args": [
        "-y",
        "@playwright/mcp@latest",
        "--extension"
      ],
      "env": {}
    },
    "nuxt-ui-remote": {
      "type": "http",
      "url": "https://ui.nuxt.com/mcp"
    }
  }
}
Codex/ChatGPT doesn’t (yet?) have a project local CLI command for MCP so we’ll manually create .codex/config.toml:
[mcp_servers.nuxt-ui-remote]
enabled = true
url = https://ui.nuxt.com/mcp"

[mcp_servers.playwright]
command = "npx"
args = ["@playwright/mcp@latest", "--extension"]
In practice, with CSharpRepl, Playwright becomes only necessary to address UI layout since the agent can directly interface with the application at the API interface layer for E2E integration testing (bypassing the need to perform auth or use slower UI interactions altogether).
Setting up the applications
Scaffold the backend minimal web API
For this application, we’re going to use a slightly tweaked minimal web API that I think makes it easier for agents to work with.
mkdir src
mkdir src/server
cd src/server
dotnet new webapi --no-https
dotnet user-secrets init
dotnet user-secrets set AppSettings:LlmApiKey "YOUR_API_KEY_HERE"
cd ../../
dotnet new sln              # Add solution file
dotnet sln add src/server   # Add the project to the solution
dotnet build                # First build
At this point, the server can already run, but it’s only serving the default weather forecast endpoint.
We’re going to add two helper interfaces: IEndpoint and IEndpointHandler to make it easier to parcel out the endpoint implementations into separate files. We’ll also add the configuration object as well.
// src/server/IEndpoint.cs
public interface IEndpoint
{
    void MapEndpoints(IEndpointRouteBuilder endpoints);
}

// src/server/IEndpointHandler.cs
public interface IEndpointHandler { }

// src/server/AppSettings.cs
public record AppSettings
{
    public string LlmApiKey { get; init; } =
        "dotnet user-secrets set AppSettings:LlmApiKey YOUR_API_KEY_HERE";
}
We’ll add the Scrutor package to make the wiring a bit more terse:
cd src/server
dotnet add package Scrutor
Then in src/server/Program.cs, replace with:
var builder = WebApplication.CreateBuilder(args);

// Add the settings into the DI container
builder
    .Services.AddOptions<AppSettings>()
    .Bind(builder.Configuration.GetSection(nameof(AppSettings)))
    .ValidateOnStart();

// Wire up endpoints into the DI container
builder
    .Services.AddOpenApi()
    .Scan(scan =>
        scan.FromApplicationDependencies()
            .AddClasses(classes => classes.AssignableTo<IEndpoint>())
            .AsImplementedInterfaces()
            .WithTransientLifetime()
            .AddClasses(classes => classes.AssignableTo<IEndpointHandler>())
            .AsSelf()
            .WithTransientLifetime()
    );

var app = builder.Build();

if (app.Environment.IsDevelopment())
{
    app.MapOpenApi();
}

// Connect the endpoints
var endpoints = app.Services.GetRequiredService<IEnumerable<IEndpoint>>();

foreach (var endpoint in endpoints)
{
    endpoint.MapEndpoints(app);
}

app.Run();
To test this, we’ll add a simple health check endpoint and handler.
// src/server/Health.cs
public class HealthEndpoint : IEndpoint
{
    public void MapEndpoints(IEndpointRouteBuilder endpoints)
    {
        endpoints.MapGet("/health", (HealthHandler handler) => handler.Handle());
    }
}

public class HealthHandler : IEndpointHandler
{
    public string Handle() => $"Healthy @ {DateTime.UtcNow}";
}
This design is intentional even though the health handler is simple enough to implement directly inline with the MapGet. By injecting handlers as a dependency, we’ll be able to directly manipulate it at runtime later using CSharpRepl. While this example is simple, a key ingredient to successful agentic engineering is consistency. So a goal here is to establish the pattern that the agent will follow when building the next set of handlers.
Now we can quickly run and curl this as a smoke test:
# Run the server
dotnet run

# Check the endpoint
curl http://localhost:5138 -v # Healthy @ 8/11/2026 8:46:50 PM
Scaffold the frontend Nuxt UI Vite app
The Nuxt UI Vite app setup mostly follows this doc: https://ui.nuxt.com/docs/getting-started/installation/vue
We’ll use the starter Vue + Vite template: https://github.com/nuxt-ui-templates/starter-vue
mkdir src/app
cd src/app
git clone https://github.com/nuxt-ui-templates/starter-vue.git .
# Remove the .git directory and .github directory since we don't need these
rm -rf .git .github
This gives us a basic starter template (see the template) so we can skip the manual wiring of Nuxt UI itself.
cd src/app
pnpm dev # App served at http://localhost:5173/
Wiring into Aspire
Now that we have both the backend and frontend scaffolded, we can wire them into Aspire so that one command orchestrates the stack (albeit a simple stack at the moment!).
Create the Aspire host
Because the application has .slnx file at the root, Aspire will create a project-based setup:
# From root
aspire init --language csharp

# Rename for convenience
mv zeeq-tmpl.AppHost host
mv host/zeeq-tmpl.AppHost.csproj host/host.csproj

# Add to the solution and add a reference to the server project
dotnet sln add host
dotnet add reference --project host src/server

# Add the JavaScript module that will give us pnpm and Vite support
aspire add # Then type and select "JavaScript"
At this point, you can use the aspireify skill to wire up the app, but it’s also instructive to set it up manually.
Add the Aspire resources
Now we can add the two application resources to the host.
// host/AppHost.cs
var builder = DistributedApplication.CreateBuilder(args);

var backend = builder.AddProject<Projects.server>("app-backend");

var frontend = builder
    .AddViteApp(name: "zeeq-planner", appDirectory: "../src/app")
    .WithPnpm()
    // 👇 Note: I fixed a port here to make it easier to find
    .WithEndpoint(name: "http", port: 7321, scheme: "http")
    .WaitFor(backend);

builder.Build().Run();
The stack is ready to run 🚀:
# Start the stack
➜  zeeq-tmpl aspire run --detach --non-interactive
Finding AppHosts...
host/host.csproj
🛑 Stopping previous instance (AppHost PID: 85558, CLI PID: 85469)
✅ Running instance stopped successfully.
Starting Aspire AppHost in the background...

     AppHost:  host/host.csproj

   Dashboard:  https://localhost:17245/login?t=8555e27c92c928953486d41d2a3d0db8

        Logs:  /Users/cchen/.aspire/logs/cli_20260811T211920737_detach-child_7987c3fad30b
               4bc88b08ced7272136b8.log

         PID:  87818

✅ AppHost started successfully.

# Stop the stack
aspire stop
This same pattern can be used to wire up Postgres, Redis, Kafka, and many other modules that Aspire supports which makes it easy to build full-stack, distributed applications that start up with a single command and provides agents with the right interfaces to rapidly iterate on the application.
Setting up CSharpRepl and a quick smoke test
CSharpRepl’s wiring requires running csharprepl connect init to list the location of the CSharpRepl installation. To automate this, we’ll need to run the command and parse it out of the output.
using System.Diagnostics;

var builder = DistributedApplication.CreateBuilder(args);

var csrHook = ResolveCSharpReplHook(); // 👈 Extract the local hook path

var backend = builder
    .AddProject<Projects.server>("app-backend")
    // 👇 Wire up CSharpRepl environment variables to the runtime.
    .WithEnvironment("DOTNET_STARTUP_HOOKS", csrHook)
    .WithEnvironment("ASPNETCORE_HOSTINGSTARTUPASSEMBLIES", "CSharpRepl.InjectedHook");

var frontend = builder
    .AddViteApp(name: "app-frontend", appDirectory: "../src/app")
    .WithPnpm()
    .WithEndpoint(name: "http", port: 7321, scheme: "http")
    .WaitFor(backend);

builder.Build().Run();

// ⭐️ A helper function that runs `csharprepl connect init` and extracts the path to
// the hook .dll from the output.
string ResolveCSharpReplHook()
{
    var process =
        Process.Start(
            new ProcessStartInfo
            {
                FileName = "csharprepl",
                Arguments = "connect init",
                RedirectStandardOutput = true,
                UseShellExecute = false,
                CreateNoWindow = true,
            }
        ) ?? throw new InvalidOperationException("Failed to start csharprepl process.");

    // Full output from the command; need to extract just the hook .dll
    return process
        .StandardOutput.ReadToEnd()
        .Split('\n')
        .Select(line => line.Trim())
        .First(line => line.StartsWith("export DOTNET_STARTUP_HOOKS="))
        .Split('"')[1];
}
csharprepl connect list will show the running processes:
➜  zeeq-tmpl git:(main) ✗ csharprepl connect list

  PID   │ Process
 ───────┼─────────────────────
  71304 │ dotnet
  71441 │ dotnet
  92260 │ server
And we can connect directly to the repl with csharprepl connect <PID> and manipulate the runtime application.
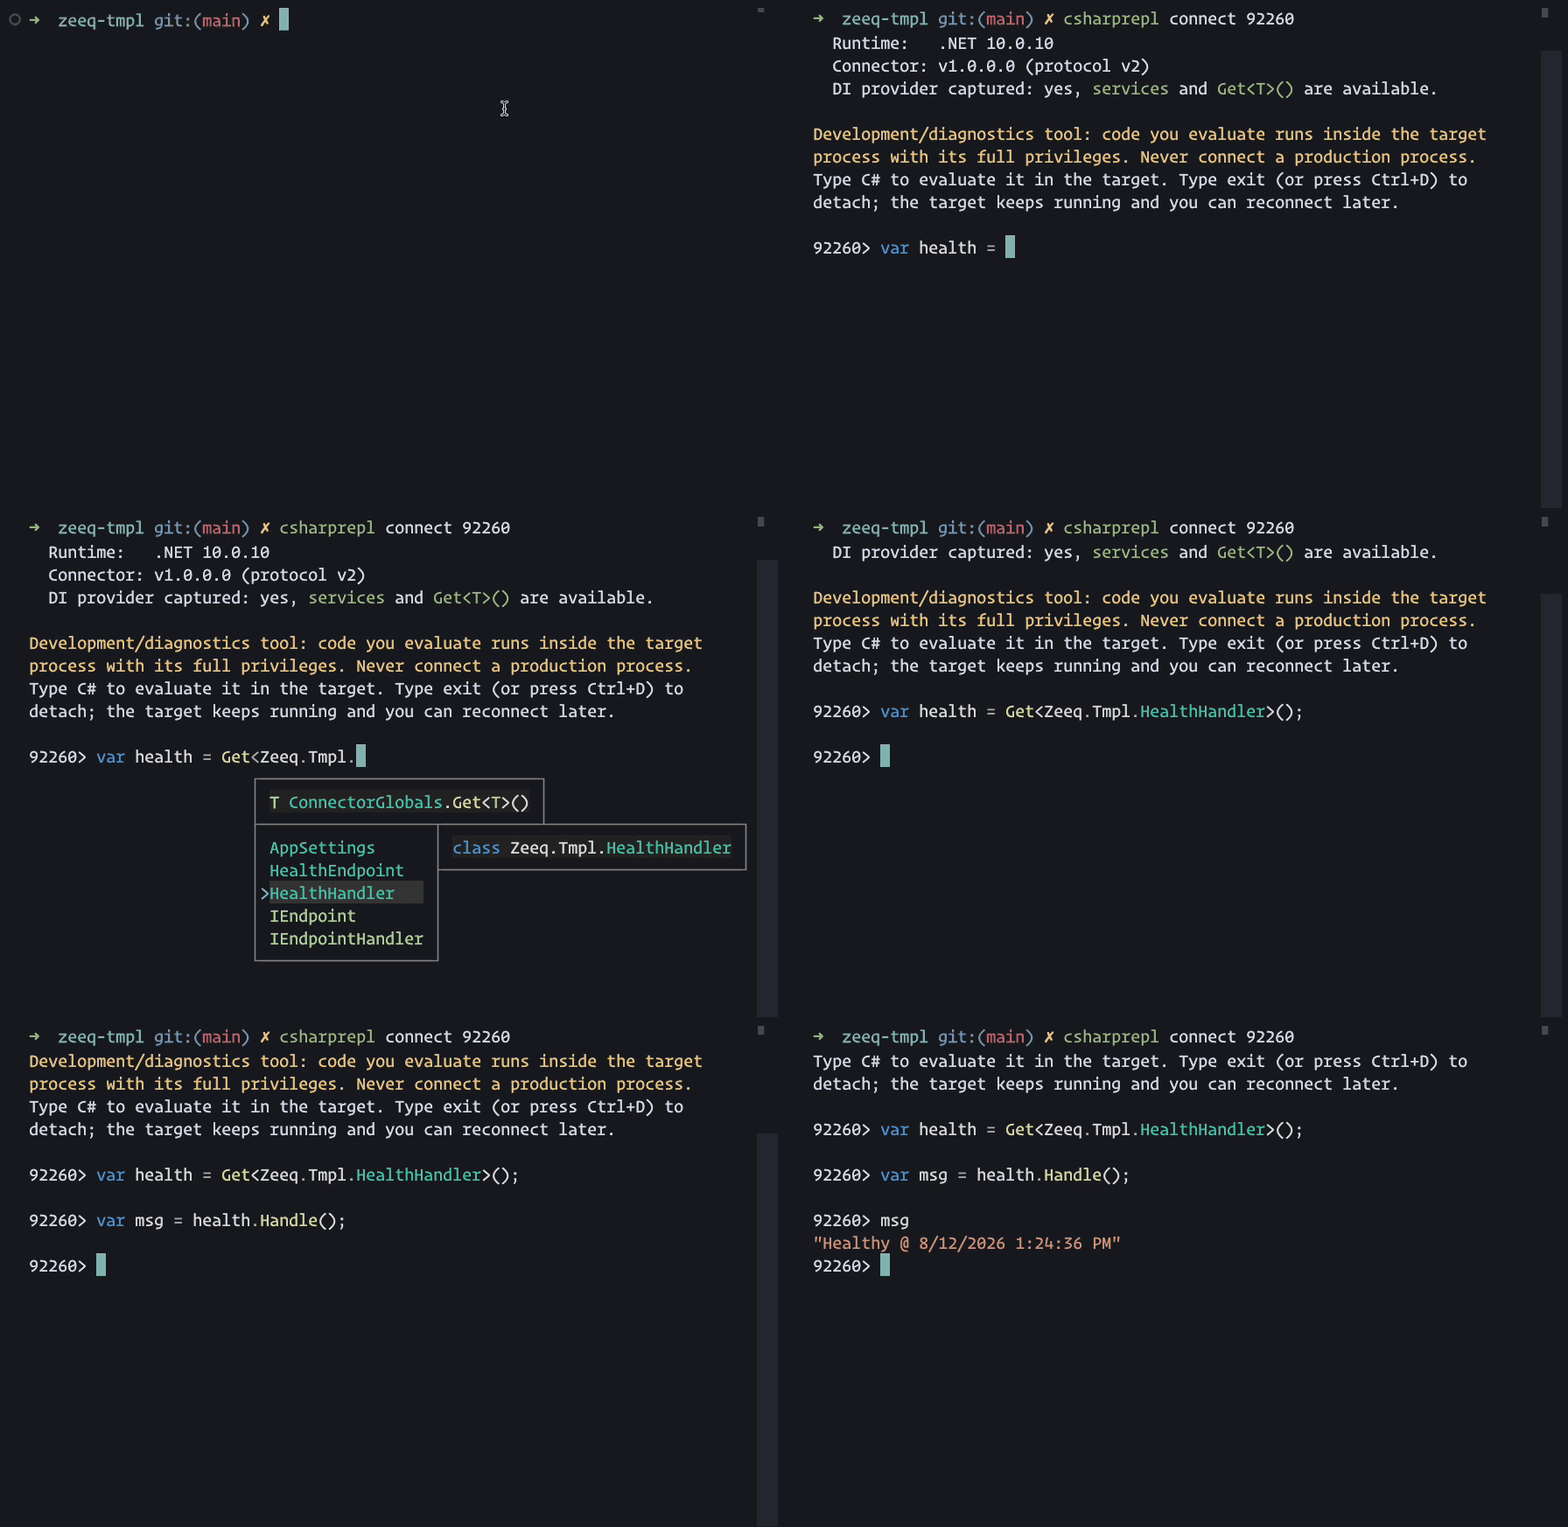
Coding agents will be able to use the same REPL via --eval <code> or --eval-file <file> to manipulate the runtime state of the application.
Here’s an example of replace the health endpoint to change the logging behavior:
printf '%s\n' \
  '#replace Zeeq.Tmpl.HealthHandler.Handle with (instance) => "Healthy (replaced!)"' \
  'var health = Get<Zeeq.Tmpl.HealthHandler>(); var msg = health.Handle(); msg' \
  | NO_COLOR=1 csharprepl connect 92260 --streamPipedInput
What I hope is impressed here is that with CSharpRepl connected, agents can directly work with the fully wired up DI container and effectively simulate failure modes more realistically than possible with only integration tests. This gives agents a powerful tool to iterate and diagnose, build, or perform E2E regression tests in more realistic scenarios.
Closing thoughts
In part 2 of examining how to use C#, .NET, and Aspire to build agent-friendly applications, we’ve set up the foundation to build and extend the application.
What should be evident at this stage is that Aspire and CSharpRepl provide a powerful combination of tools that allow agents to operate autonomously and iterate on an application rapidly. This same scaffolding will make it easier to reproduce issues, reproduce production failure modes, check for regressions, and experiment with new features rapidly.
In the next section, we’ll:
- Add a skill to help agents understand how to effectively use CSharpRepl
- Wire up the API client generation from the backend to the frontend
- Start to incorporate the Copilot SDK and build a simple streaming chat interface to the agent now that the foundation of the application is ready.
If you are curious to see a real-world setup, check out the Zeeq.ai repo: https://github.com/zeeq-ai/zeeq-app
Still human written (mistakes and all!); see the file history in the repo.